Fear and Loathing in AWS or Adventures in Partition Resizing
Note - This is very, very long. It is isn't done yet and it is 3,589 words when I thought to add this note. At my normal metric of 250 words per page, that I learned in college, that's 14.5 printed pages. The reason for not splitting it up is that if you ever have these issues then you want all of this in here in one place.
A few days ago I made a mistake – a significant one. I had a large data load running into a MySQL database and I wasn't really thinking about the storage implications of it. To make matters worse this was the only box in the cluster that wasn't running the monitoring software I like – Inspeqtor. The db server had been the first box I had configured when I brought up all of our boxes and I never went back and installed Inspeqtor. I know, I know – an amateur's mistake at best. But, and it is no excuse, we've been running hard and fast for a while and, ultimately, this always catches up to you.
So you know where this is going – we ran out of space. And out of space on a db server is generally a bad thing. Sometimes it falls into the category of "ok bad" and other times it falls into the category of "oh shite bad". This was "oh shite bad". I spent about 12 hours wondering if I'd get back my data, not when. Happily, my luck held, and it was when and that when is likely about 24 more hours from the time of this writing. A bunch of the data has already been recovered and, with that, it is time to write the retrospective mea culpa and maybe cast some light on what is honestly a fairly crappy aspect of AWS.
Now, unlike most of my AWS writings which I structure as tutorials, this is not a tutorial. It is more of an essay or perhaps advice. I couldn't fully document the meandering path that I took as it was done under pressure and with a fair to moderate level of cursing.
Note: When I went through all this I was fairly dissatisfied with AWS in this regard and there are some real quirks to storage and minor issues but when I think about what this would have taken with a classical data center, I applaud Amazon. My guess is that if I had to get professional operations people involved to have helped with this, I would quickly be out a few thousand dollars in high priced on call labor.
Understand This Well, Very Well, Here There Be Dragons
The first thing to understand is that the steps I took and the tools I used are dangerous. Had I taken a slightly wrong path I would likely have lost everything. If you are going to walk this type of road then I strongly recommend:
- Do it with a second set of eyes. I am an unabashed fan of pair programming and whenever things are bad I prefer to have a pairing buddy. My normal pairing partner, Dv, wasn't available when all this was going on so I brought on Nick as a consultant for this ordeal and he was fantastic. At two critical junctures he kept me from going astray. Highly recommended.
- Take your time. When data recovery is an issue you need to take your time and actually think. If people are yelling at you to get it done and hurry up then, well, don't listen to them. If I hadn't brought this back up it would have likely cost us between 1 and 3 months of lost effort. With those kind of stakes I'm going to take my damn time and so should you.
- When in doubt – stop. It is always tempting to plunge forward since you are almost there. Nope. When in doubt my advice is rest, coffee or even sleep. Some things just can't be rushed and understanding that is key.
Initial Mistakes Made
As I look back at this I can see that I made one real mistake early in setting up this, our first AWS box was that I didn't really analyze our data volumes and growth rate and do some projections. I've done that now, at least a bit, and I wish I had done that at the start. For this project we're growing at about 250 + gigs per month. When I setup our database server I went for a very simple configuration – a 2 terabyte volume configured as the boot volume. Apparently, even today, there are still hard and fast limits such as you can't have a boot volume greater than two terabytes. Sigh. What I should have done is have a small boot volume and then a data volume that was 2 terabytes. I can't prove it but I think that if I had done this my woes in partition resizing would not have happened.
Take away advice:
- For a db server always have a small boot volume
- Make your database store its data on a non boot volume; yes that's obvious based on #1 but I'm being explicit.
- I suspect that if I had used LVM things might have been better but I've never understood LVM very well.
- Whatever you do make absolutely certain that if you are using MySQL then at the version you are using either has innodb_per_file either turned on or as the default. At my last data center I had this manually turned on in my.cnf. And it became the default in MySQL 5.6. I never dreamed when I set up my boxes at AWS this past fall that I didn't get 5.6 as part of a normal apt-get install mariadb operation. This option defines whether you have a single gigantic blob of disc space that stores all your files or a blob of disc space per table. When you use innodb_per_file, despite some issues, it means that you can address storage needs far more granularly by applying symlinks to different file systems. This is an incredible advantage for handling large amounts of data.
Note: If you understand the issues of innodb_per_file then you can likely ignore #4. And, honestly, if you understand it then perhaps you should drop me a resume; I'm always looking for talent.
But Why Didn't You Use RDS?
I'm sure someone out there is shouting at their phone or tablet saying Why, oh dear lord, why didn't you use RDS. Well I actually tried to use RDS, specifically Aurora, but found, for our data, RDS led to silent data loss on data load. I don't know why but I verified it myself and I was in a hurry so I just setup my own DB server. Yes RDS would have been easier but not if it loses data.
Take away advice:
- RDS is still a new technology; be wary
- Make sure that if you have large or complex data loads that it does load everything you give it. Verify your row counts between old and new servers.
Step 1 - Reboot the Server
When a database server runs out of space, the database software itself generally goes down and that's actually good. The first step is always, always, always to reboot the server. A reboot generally clears up at least some disc space, often enough to get things operational again. I wouldn't recommend actually adding more info to the database until you solve the storage issues but you can at least get access to the system.
Take away advice:
- Reboot your database server after problems to clear up some space.
- If your database software isn't quickly accessible it is likely recovering from the crash. Check the logs and be patient. MySQL, my database of choice, is excellent at recovery. I can't speak to other databases but MySQL has always been great at this in my experience.
Step 2 - Get a Second Set of Eyes
As described above I strongly recommend getting a second set of eyes early in the process. You really should do this. It made all the difference in keeping things on track.
Step 3 - Understanding Storage in the AWS World
Most of us are familiar with storage in terms of our personal systems but AWS is a bit of different thing. Here is what I learned through trial and error:
- Any EC2 server can have multiple chunks of storage attached to it.
- These chunks of storage are called volumes.
- When you need more storage you can just create a volume.
- Newly created volumes are entirely blank and do NOT have a file system on them. For people from a Windows background in particular this can be odd.
- Before you can use a volume you need to either attach or detach it.
- Volumes need to be mounted with either a mount command or fstab.
-
When you need to transfer a LOT of data from EC2 server 1 to EC2 server 2 then:
- You can create a volume
- You can attach it to the source of the data (say a machine you are using for running mysqldump)
- You can make a filesystem on it
- You can mount it
- You can dump your data to the new volume
- You can detach the volume
- You can attach it to the destination of the data
- You can mount it
- You can load the data
- If you need to bring parallelism to things there is nothing stopping you from creating multiple volumes, putting data in one, moving it to the destination and then using another volume to continue the process.
- All of your old school Unix commands come in handy.
- Snapshots are quickly created backups that you can use to initialize a volume with data.
If you need a way to visualize AWS storage then think of it this way:
- Volumes are external hard drives that you can create freely and attach to servers.
- You can have as many as you want within reason; you aren't constrained by the number of ports you have in your machine.
- Attaching and then mounting is equivalent to plugging the volume in
Step 4 - Experiment Before You Do Anything With Your Data
One of the brilliant aspects of AWS is that you can experiment with abandon. Need to see how to mess about with a 4 terabyte partition? You can just create one and then try things. I'd strongly recommend experimenting with the process in full before you risk your data.
Step 5 - The Low Level Unix Commands in Question
There are several underlying low level Unix commands that I had to use during the course of this.
The fstab File
Fstab isn't a command, it is a user defined ASCII data file in /etc i.e. /etc/fstab that defines how logical volumes are attached to the computer you're working on and where they are mounted. What you have to is create a master directory such as /mnt and then subdirectories where you want discs to be attached such as /mnt/old. The instructions in fstab would then connect a low level volume such as /dev/xvdf to that directory allowing you to ls, cd and so on.
Here's an example from one of my boxes:
cat /etc/fstab
LABEL=cloudimg-rootfs	/	 ext4	defaults,discard	0 0
/dev/xvdf  /mnt/old. ext4  defaults,discard 0 0
This shows two logical drives, one from the AWS default setup and one volume I created. Both are ext4 filesystems and they are mounted at / and /mnt/old respectively.
Since we're into /etc/fstab, I would be remiss if I didn't point out the noatime issue which I didn't realize was still a thing in 2016 but apparently it still is. Here are some urls to read:
- Absolutely Worth It
- MySQL / Innodb on noatime
- Ask Ubuntu 1
- ServerFault
- Ask Ubuntu 2
- 30% Disk Performance Gains with Noatime
Note: I'm going to add noatime and nodiratime into my mount statements shortly. This is what I'm going to add to my fstab:
rw,noatime,nodiratime,nobarrier,data=ordered
which I sourced from here. Once that's set in /etc/fstab then I'm going to:
sudo service mysql stop (making certain that nothing is using the db first)
mount -o remount
You can also do it this way without modifying fstab but then you lose the options on reboot so that's kind of suckass.
Mounting a Drive - mount
The mount command mounts the volumes identified in /etc/fstab. You need to use this after you have attached a drive using the AWS console in order to make it available to the system. If it helps you to understand this then think of the AWS Console's attach command as equivalent to plugging in a hardware cable to a drive whereas mount is the software side.
sudo mount -a
You can also mount without an fstab file like this:
sudo mount /dev/sdg /vol -t ext4
Unmounting a Drive - umount
When you need to detach a volume with the AWS console you first need to unmount it with umount.
sudo umount /dev/xvdf
When you can't unmount a volume with the AWS console, what do you do – you do this:
sudo umount /devxda1
And when you get
umount: /: device is busy.
then you need to figure out what process still has this open. Two tools for this are lsof and fuser (I was much more successful with fuser).
List Block Devices - lsblk
The lsblk command shows you the logical block devices on your system. A block device essentially means a disk but it could be something else. This one was new to me or at least something I don't think I've used since I ran Fedora on my ThinkPad back in 2000. Here's an example:
lsblk
NAME                                MAJ:MIN RM   SIZE RO TYPE MOUNTPOINT
xvda                                202:0    0     8G  0 disk
└─xvda1                             202:1    0     8G  0 part /
xvdb                                202:16   0   3.9T  0 disk /mnt/new
xvdf                                202:80   0     2T  0 disk
loop0                                 7:0    0   100G  0 loop
└─docker-202:1-276736-pool (dm-0)   252:0    0   100G  0 dm
  └─docker-202:1-276736-base (dm-1) 252:1    0    10G  0 dm
loop1                                 7:1    0     2G  0 loop
└─docker-202:1-276736-pool (dm-0)   252:0    0   100G  0 dm
  └─docker-202:1-276736-base (dm-1) 252:1    0    10G  0 dm
This is showing all the block devices. If you notice xvda this is showing a physical volume and then a logical volume within it. It is also interesting to note that docker is actually a block device. It makes sense that Docker went this route but until I saw it myself I don't think I really appreciated that; very, very cool.
File System, File System, What do We Have - file
The file command tells you what file system your disk volume supports. When I first moved to Linux professionally from Windows, as opposed to just mucking about with Linux, I remember being a bit baffled about the wealth of file system options – ext2, ext3, reiser / murderfs, etc. You really didn't see this much if at all in Windows at the time so it was disconcerting. The basic idea being having multiple filesytems is that different filesytems are good at different things. If, for example, the year is 2005 and you want to put 100,000 files in a single directory then your only real option is ReiserFS. Reiser was fantastic at this. Similarly if you need a maximum file size of 16 exabytes in size then you need Btrfs and that's likely the only filesystem on the planet other than ZFS which can do this.
Given that all data on a computer is ultimately written to a file at some point, if you can get better performance from a different filesystem, then changing filesystems is a really easy way to get better performance that affects everything. When you improve your code you affect only your application but move to a filesystem with say 10% better write speed then everything you do on that machine improves. That's the power of changing your filesystem. Now, that said, this is something where you absolutely need to understand every single issue. For example Btrfs looks great but only use it on OpenSuse or Oracle Linux. On other platforms it is still under active development.
Here's an example of using file on a newly created volume:
sudo file -s /dev/xvdf
/dev/xvdf: data
If you notice all it says is data. This means that the volume is newly created and has no filesystem yet so you'll need to use mkfs covered below.
Here's file when a filesystem exists:
sudo file -s /dev/xvdf
/dev/xvdf: Linux rev 1.0 ext4 filesystem data, UUID=2a3476d6-cb01-44e6-a4c6-3c6d3c1cb675 (extents) (large files) (huge files)
Interesting URLS:
- Best Filesystem for MariaDB
- Best Filesystem for MariaDB Stack Overflow; quite old but illustrates the tradeoffs well
- Read This But Don't Do It
- Benchmark Results
Making a File System - mkfs
The mkfs command actually creates a filesystem. Years ago this was actually slow but in 2016 even with an enormous 4TB volume it was rippingly fast:
sudo mkfs -t ext4 /dev/xvdf
Step 6 - And Now We Come to Partition Resizing
It may be hard to believe that it has taken this many words to get ourselves ready for partition resizing. Damn but I can be a wordy son of a bitch at times – apologies. Anyway I'm going to give the punch line first:
I was never, ever able to resize a 2 TB AWS boot volume to a bigger size. According to the AWS docs this should be possible but they are actually fairly crappy with respect to volume issues. No matter what I did I kept getting superblock / magic number errors that I could not get past.
The basic process should have been something like this:
- Create a snapshot of the current volume
- Create a new volume of the desired size
- Import the snapshot into the new volume
- Use parted / gpt to adjust the core partition to the new size
- Use resizefs to finish the process
- Profit!!!
Honestly I was really, really surprised that in 2016 trying to resize a Linux partition was such an absolute shite show. Perhaps it was me but the other person pairing on this had no better luck than I. It should not have been this hard.
So, somewhat unfortunately, I ended up having to do a full dump / restore of my database to get around this. And while that sucked monkey chunks it did end up wiht some positive things as covered in the next section.
AWS Gotchas
While at this step we hit a number of gotchas that were really confusing at first. The first of these was the fact that logical device names change depending on AWS versus which kernel you have.
(Here it is /dev/sdf)

(Here it is /dev/xvdf)

(Here is the warning)
I find it absolutely inconceivable that Amazon can't do better than this. Given the possibility for destructive errors by getting things wrong this should be much, much better. Given that this is a controlled cloud computing environment, doesn't Amazon know the kernel?
Note: I'm a self admitted amazon fan boy for AWS so for me to say this means I think its really really serious.
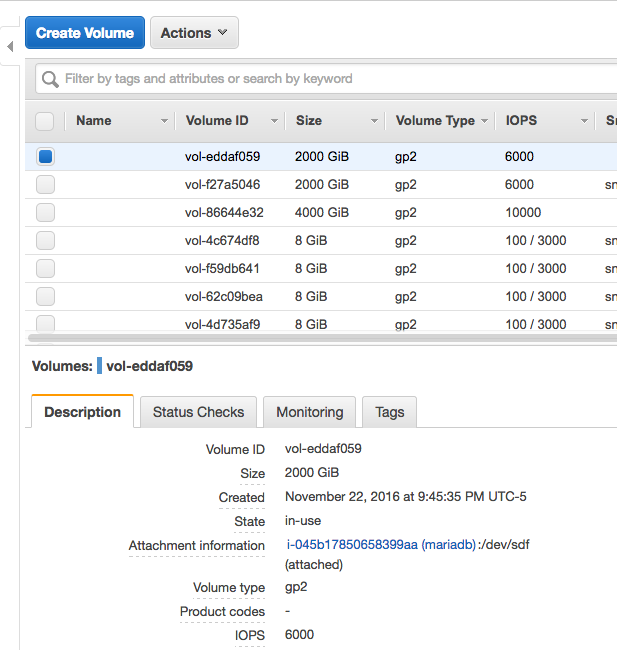
When you create a disc volume there is no option for naming / tagging it at creation time:
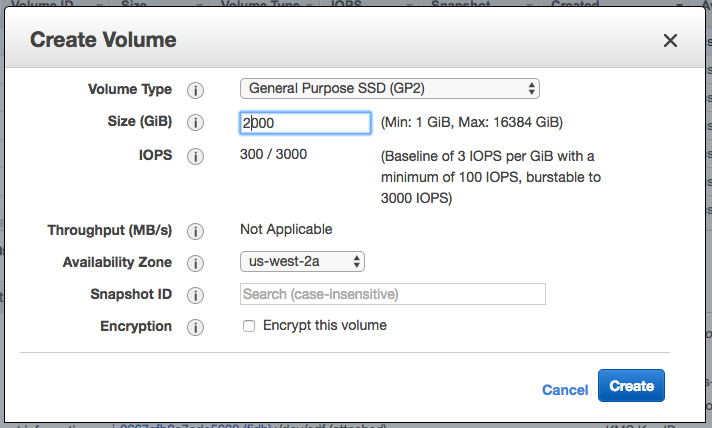
That is equally sucky. Do this a lot and you end with a bunch of things name vol-64bb3234d and vol-534343bc and you're scratching your head going "hm…". Yes you can name them after but that increases the chance that they never get named.
My Path If Its Useful To You
Here is my rough, meandering path thru resize2fs, parted and gpt in case anyone out there wants to tell me where I went wrong.
__AWS_PRODUCTION__ ubuntu@ip-172-31-45-225:~$ resize2fs /dev/xvda1
resize2fs 1.42.9 (4-Feb-2014)
open: Permission denied while opening /dev/xvda1
__AWS_PRODUCTION__ ubuntu@ip-172-31-45-225:~$ sudo resize2fs /dev/xvda1
resize2fs 1.42.9 (4-Feb-2014)
The filesystem is already 536868903 blocks long.  Nothing to do!


sudo parted /dev/xvdg1
GNU Parted 2.3
Using /dev/xvdg1
Welcome to GNU Parted! Type 'help' to view a list of commands.
(parted) unit s
(parted) print
Model: Unknown (unknown)
Disk /dev/xvdg1: 4294951231s
Sector size (logical/physical): 512B/512B
Partition Table: loop

Number  Start  End          Size         File system  Flags
 1      0s     4294951230s  4294951231s  ext4

(parted) rm 1
Error: Partition(s) 1 on /dev/xvdg1 have been written, but we have been unable to inform the kernel of the change, probably because it/they are in use.  As a result, the old
partition(s) will remain in use.  You should reboot now before making further changes.
Ignore/Cancel? c
(parted) quit
Information: You may need to update /etc/fstab.

lsblk
NAME    MAJ:MIN RM  SIZE RO TYPE MOUNTPOINT
xvda    202:0    0    8G  0 disk
└─xvda1 202:1    0    8G  0 part /
xvdn    202:208  0  3.9T  0 disk
└─xvdn1 202:209  0    2T  0 part
[ec2-user@ip-172-31-45-119 ~]$ sudo parted /dev/xvdn
GNU Parted 2.1
Using /dev/xvdn
Welcome to GNU Parted! Type 'help' to view a list of commands.
(parted) help
  align-check TYPE N                        check partition N for TYPE(min|opt) alignment
  check NUMBER                             do a simple check on the file system
  cp [FROM-DEVICE] FROM-NUMBER TO-NUMBER   copy file system to another partition
  help [COMMAND]                           print general help, or help on COMMAND
  mklabel,mktable LABEL-TYPE               create a new disklabel (partition table)
  mkfs NUMBER FS-TYPE                      make a FS-TYPE file system on partition NUMBER
  mkpart PART-TYPE [FS-TYPE] START END     make a partition
  mkpartfs PART-TYPE FS-TYPE START END     make a partition with a file system
  move NUMBER START END                    move partition NUMBER
  name NUMBER NAME                         name partition NUMBER as NAME
  print [devices|free|list,all|NUMBER]     display the partition table, available devices, free space, all found partitions, or a particular partition
  quit                                     exit program
  rescue START END                         rescue a lost partition near START and END
  resize NUMBER START END                  resize partition NUMBER and its file system
  rm NUMBER                                delete partition NUMBER
  select DEVICE                            choose the device to edit
  set NUMBER FLAG STATE                    change the FLAG on partition NUMBER
  toggle [NUMBER [FLAG]]                   toggle the state of FLAG on partition NUMBER
  unit UNIT                                set the default unit to UNIT
  version                                  display the version number and copyright information of GNU Parted
(parted) unit s
(parted) print
Model: Xen Virtual Block Device (xvd)
Disk /dev/xvdn: 8388608000s
Sector size (logical/physical): 512B/512B
Partition Table: msdos

Number  Start   End          Size         Type     File system  Flags
 1      16065s  4294967295s  4294951231s  primary  ext4         boot

(parted) rm 1
(parted) mkpart primary 16065s 100%
Error: partition length of 8388591935 sectors exceeds the msdos-partition-table-imposed maximum of 4294967295
(parted) print
Model: Xen Virtual Block Device (xvd)
Disk /dev/xvdn: 8388608000s
Sector size (logical/physical): 512B/512B
Partition Table: msdos

Number  Start  End  Size  Type  File system  Flags

(parted) rm 1^C
(parted) ^C
(parted) ^C
(parted) ^C
(parted) quit
Information: You may need to update /etc/fstab.

[ec2-user@ip-172-31-45-119 ~]$ sudo parted /dev/xvdn
GNU Parted 2.1
Using /dev/xvdn
Welcome to GNU Parted! Type 'help' to view a list of commands.
(parted) print
Model: Xen Virtual Block Device (xvd)
Disk /dev/xvdn: 4295GB
Sector size (logical/physical): 512B/512B
Partition Table: msdos

Number  Start  End  Size  Type  File system  Flags

(parted) mklabel gpt
Warning: The existing disk label on /dev/xvdn will be destroyed and all data on this disk will be lost. Do you want to continue?
Yes/No? no
(parted) ^C
(parted) quit
[ec2-user@ip-172-31-45-119 ~]$ gdisk
GPT fdisk (gdisk) version 0.8.10

Type device filename, or press <Enter> to exit: /dev/xvdn
Problem opening /dev/xvdn for reading! Error is 13.
You must run this program as root or use sudo!
[ec2-user@ip-172-31-45-119 ~]$ sudo gdisk
GPT fdisk (gdisk) version 0.8.10

Type device filename, or press <Enter> to exit: /dev/xvdn
Partition table scan:
  MBR: MBR only
  BSD: not present
  APM: not present
  GPT: not present


***************************************************************
Found invalid GPT and valid MBR; converting MBR to GPT format
in memory. THIS OPERATION IS POTENTIALLY DESTRUCTIVE! Exit by
typing 'q' if you don't want to convert your MBR partitions
to GPT format!
***************************************************************


Command (? for help): p
Disk /dev/xvdn: 8388608000 sectors, 3.9 TiB
Logical sector size: 512 bytes
Disk identifier (GUID): 93F6FAE1-8253-4399-B31B-0B49896792B0
Partition table holds up to 128 entries
First usable sector is 34, last usable sector is 8388607966
Partitions will be aligned on 2048-sector boundaries
Total free space is 8388607933 sectors (3.9 TiB)

Number  Start (sector)    End (sector)  Size       Code  Name

Command (? for help): o
This option deletes all partitions and creates a new protective MBR.
Proceed? (Y/N): ^C[ec2-user@ip-172-31-45-119 ~]$ ^C
[ec2-user@ip-172-31-45-119 ~]$ exit
logout
Connection to ec2-35-163-65-227.us-west-2.compute.amazonaws.com closed.
FuzzygroupMacbookPro2016:~ sjohnson$ ssh -i "~/.ssh/fi_nav_sitecrawl.pem" ec2-user@ec2-35-163-65-227.us-west-2.compute.amazonaws.com
Last login: Tue Nov 22 19:40:18 2016 from 64-184-12-117.dial.hrtc.net

       __|  __|_  )
       _|  (     /   Amazon Linux AMI
      ___|\___|___|

https://aws.amazon.com/amazon-linux-ami/2016.09-release-notes/
6 package(s) needed for security, out of 11 available
Run "sudo yum update" to apply all updates.
[ec2-user@ip-172-31-45-119 ~]$ df -h
Filesystem      Size  Used Avail Use% Mounted on
devtmpfs        488M   64K  488M   1% /dev
tmpfs           498M     0  498M   0% /dev/shm
/dev/xvda1      7.8G  975M  6.7G  13% /
[ec2-user@ip-172-31-45-119 ~]$ sudo e2fsck -f /dev/sdbm
e2fsck 1.42.12 (29-Aug-2014)
e2fsck: No such file or directory while trying to open /dev/sdbm
Possibly non-existent device?
[ec2-user@ip-172-31-45-119 ~]$ sudo e2fsck -f /dev/sdm
e2fsck 1.42.12 (29-Aug-2014)
ext2fs_open2: Bad magic number in super-block
e2fsck: Superblock invalid, trying backup blocks...
e2fsck: Bad magic number in super-block while trying to open /dev/sdm

The superblock could not be read or does not describe a valid ext2/ext3/ext4
filesystem.  If the device is valid and it really contains an ext2/ext3/ext4
filesystem (and not swap or ufs or something else), then the superblock
is corrupt, and you might try running e2fsck with an alternate superblock:
    e2fsck -b 8193 <device>
 or
    e2fsck -b 32768 <device>

[ec2-user@ip-172-31-45-119 ~]$ sudo e2fsck -f /dev/sdm^C
[ec2-user@ip-172-31-45-119 ~]$ lsblk
NAME    MAJ:MIN RM  SIZE RO TYPE MOUNTPOINT
xvda    202:0    0    8G  0 disk
└─xvda1 202:1    0    8G  0 part /
xvdm    202:192  0  3.9T  0 disk
└─xvdm1 202:193  0    2T  0 part
[ec2-user@ip-172-31-45-119 ~]$ sudo e2fsck -f /dev/xvdm
e2fsck 1.42.12 (29-Aug-2014)
ext2fs_open2: Bad magic number in super-block
e2fsck: Superblock invalid, trying backup blocks...
e2fsck: Bad magic number in super-block while trying to open /dev/xvdm

The superblock could not be read or does not describe a valid ext2/ext3/ext4
filesystem.  If the device is valid and it really contains an ext2/ext3/ext4
filesystem (and not swap or ufs or something else), then the superblock
is corrupt, and you might try running e2fsck with an alternate superblock:
    e2fsck -b 8193 <device>
 or
    e2fsck -b 32768 <device>

[ec2-user@ip-172-31-45-119 ~]$ sudo parted /dev/xvdm
GNU Parted 2.1
Using /dev/xvdm
Welcome to GNU Parted! Type 'help' to view a list of commands.
(parted) print
Model: Xen Virtual Block Device (xvd)
Disk /dev/xvdm: 4295GB
Sector size (logical/physical): 512B/512B
Partition Table: msdos

Number  Start   End     Size    Type     File system  Flags
 1      8225kB  2147GB  2147GB  primary  ext4         boot

(parted) quit
[ec2-user@ip-172-31-45-119 ~]$ df -h^C
[ec2-user@ip-172-31-45-119 ~]$ sudo gdisk /dev/xvdm
GPT fdisk (gdisk) version 0.8.10

Partition table scan:
  MBR: MBR only
  BSD: not present
  APM: not present
  GPT: not present


***************************************************************
Found invalid GPT and valid MBR; converting MBR to GPT format
in memory. THIS OPERATION IS POTENTIALLY DESTRUCTIVE! Exit by
typing 'q' if you don't want to convert your MBR partitions
to GPT format!
***************************************************************


Command (? for help): ?
b	back up GPT data to a file
c	change a partition's name
d	delete a partition
i	show detailed information on a partition
l	list known partition types
n	add a new partition
o	create a new empty GUID partition table (GPT)
p	print the partition table
q	quit without saving changes
r	recovery and transformation options (experts only)
s	sort partitions
t	change a partition's type code
v	verify disk
w	write table to disk and exit
x	extra functionality (experts only)
?	print this menu

Command (? for help): p
Disk /dev/xvdm: 8388608000 sectors, 3.9 TiB
Logical sector size: 512 bytes
Disk identifier (GUID): 024ED60B-7DA6-4AB2-A8DC-9B0963E3B56C
Partition table holds up to 128 entries
First usable sector is 34, last usable sector is 8388607966
Partitions will be aligned on 8-sector boundaries
Total free space is 4194325603 sectors (2.0 TiB)

Number  Start (sector)    End (sector)  Size       Code  Name
   1           16065      4194298394   2.0 TiB     8300  Linux filesystem

Command (? for help): o
This option deletes all partitions and creates a new protective MBR.
Proceed? (Y/N): Y

Command (? for help): n
Partition number (1-128, default 1): 1
First sector (34-8388607966, default = 2048) or {+-}size{KMGTP}: 16065
Information: Moved requested sector from 16065 to 14336 in
order to align on 2048-sector boundaries.
Use 'l' on the experts' menu to adjust alignment
Last sector (14336-8388607966, default = 8388607966) or {+-}size{KMGTP}: 8388607966
Current type is 'Linux filesystem'
Hex code or GUID (L to show codes, Enter = 8300): 8300
Changed type of partition to 'Linux filesystem'

Command (? for help): ?
b	back up GPT data to a file
c	change a partition's name
d	delete a partition
i	show detailed information on a partition
l	list known partition types
n	add a new partition
o	create a new empty GUID partition table (GPT)
p	print the partition table
q	quit without saving changes
r	recovery and transformation options (experts only)
s	sort partitions
t	change a partition's type code
v	verify disk
w	write table to disk and exit
x	extra functionality (experts only)
?	print this menu

Command (? for help): p
Disk /dev/xvdm: 8388608000 sectors, 3.9 TiB
Logical sector size: 512 bytes
Disk identifier (GUID): 422B4B11-7A84-40DC-8DE2-CE219D94FDEC
Partition table holds up to 128 entries
First usable sector is 34, last usable sector is 8388607966
Partitions will be aligned on 2048-sector boundaries
Total free space is 14302 sectors (7.0 MiB)

Number  Start (sector)    End (sector)  Size       Code  Name
   1           14336      8388607966   3.9 TiB     8300  Linux filesystem

Command (? for help): g
b	back up GPT data to a file
c	change a partition's name
d	delete a partition
i	show detailed information on a partition
l	list known partition types
n	add a new partition
o	create a new empty GUID partition table (GPT)
p	print the partition table
q	quit without saving changes
r	recovery and transformation options (experts only)
s	sort partitions
t	change a partition's type code
v	verify disk
w	write table to disk and exit
x	extra functionality (experts only)
?	print this menu

Command (? for help): x

Expert command (? for help): g
Enter the disk's unique GUID ('R' to randomize): 024ED60B-7DA6-4AB2-A8DC-9B0963E3B56C
The new disk GUID is 024ED60B-7DA6-4AB2-A8DC-9B0963E3B56C

Expert command (? for help): w

Final checks complete. About to write GPT data. THIS WILL OVERWRITE EXISTING
PARTITIONS!!

Do you want to proceed? (Y/N): Y
OK; writing new GUID partition table (GPT) to /dev/xvdm.
The operation has completed successfully.
[ec2-user@ip-172-31-45-119 ~]$ sudo file -sL /dev/xvdm
/dev/xvdm: GPT partition table, version 1.0, GUID: 024ed60b-7da6-4ab2-a8dc-9b0963e3b56c, disk size: 8388608000 sectors of 512 bytes
[ec2-user@ip-172-31-45-119 ~]$ sudo e2fsck -f /dev/xvdm
e2fsck 1.42.12 (29-Aug-2014)
ext2fs_open2: Bad magic number in super-block
e2fsck: Superblock invalid, trying backup blocks...
e2fsck: Bad magic number in super-block while trying to open /dev/xvdm

The superblock could not be read or does not describe a valid ext2/ext3/ext4
filesystem.  If the device is valid and it really contains an ext2/ext3/ext4
filesystem (and not swap or ufs or something else), then the superblock
is corrupt, and you might try running e2fsck with an alternate superblock:
    e2fsck -b 8193 <device>
 or
    e2fsck -b 32768 <device>

[ec2-user@ip-172-31-45-119 ~]$ sudo e2fsck -b 8193 -f /dev/xvdm
e2fsck 1.42.12 (29-Aug-2014)
e2fsck: Bad magic number in super-block while trying to open /dev/xvdm

The superblock could not be read or does not describe a valid ext2/ext3/ext4
filesystem.  If the device is valid and it really contains an ext2/ext3/ext4
filesystem (and not swap or ufs or something else), then the superblock
is corrupt, and you might try running e2fsck with an alternate superblock:
    e2fsck -b 8193 <device>
 or
    e2fsck -b 32768 <device>

[ec2-user@ip-172-31-45-119 ~]$ sudo e2fsck -b 32768  -f /dev/xvdm
e2fsck 1.42.12 (29-Aug-2014)
e2fsck: Bad magic number in super-block while trying to open /dev/xvdm

The superblock could not be read or does not describe a valid ext2/ext3/ext4
filesystem.  If the device is valid and it really contains an ext2/ext3/ext4
filesystem (and not swap or ufs or something else), then the superblock
is corrupt, and you might try running e2fsck with an alternate superblock:
    e2fsck -b 8193 <device>
 or
    e2fsck -b 32768 <device>

[ec2-user@ip-172-31-45-119 ~]$ ls^C
[ec2-user@ip-172-31-45-119 ~]$ lsblk
NAME    MAJ:MIN RM  SIZE RO TYPE MOUNTPOINT
xvda    202:0    0    8G  0 disk
└─xvda1 202:1    0    8G  0 part /
xvdm    202:192  0  3.9T  0 disk
└─xvdm1 202:193  0  3.9T  0 part
[ec2-user@ip-172-31-45-119 ~]$ sudo resize2fs -M -p /dev/xvdm
resize2fs 1.42.12 (29-Aug-2014)
resize2fs: Bad magic number in super-block while trying to open /dev/xvdm
Couldn't find valid filesystem superblock.
Step 7 - Why Having Partition Resizing Fail was Ok
The reason that I never lost my mind was that in the process of troubleshooting all this I realized that I had failed to set the innodb_per_file option when my db server was initially setup. The innodb_per_file option can only be set when a database is created / loaded so if I wanted it, I didn't have a lot of options. And, since it was a holiday and downtime was sort of naturally going on, it was actually about the best possible time to do all this. Keep in mind that while it isn't pleasant to go from mince onions for stuffing to check database dump and then to make cranberry orange relish, you can actually do this without losing your mind. By the end of it I was timing database dump routines along side recipes with ease i.e. "Ok I can make a caramel apple cobbler in the same time it takes to dump the table page2016_q2s". Certainly 2016, also known in my head as dbpocalyse, is a holiday I won't soon forget.
Step 8 - Generating Your MySQL Dump Files
Due to the size generated and the need for load concurrency I generated my mysqldump files with a rake task. All this has todo is:
all_tables = ActiveRecord::Base.connection.select_values("SHOW TABLES")
And then a simple all_tables.each loop like this will do most of the work:
all_tables.each_with_index do |table, ctr|
  dump_statement = "#{mysqldump_executable} -u#{username} -p#{password} -h#{host} #{db} #{table} > /mnt/transfer/#{table}.sql"
  puts "#{ctr} :: #{table} :: #{ctr.to_f/total*100}%"
  puts "  #{dump_statement}"
  `#{dump_statement}` if execute_dump
end
The advantage to this approach is rather than a single massive database dump you end up with a file for each table which lets you reload multiple tables in parallel.
Step 9 - Verify Your Dump Files with Tail
Here's a general bit of advice when you are dealing with multi-hour long / multi-day long mysqldump processes – make sure that they actually complete. After all when you're looking at a directory listing and all you see is this:
215121716510 page2016_q2s.sql
How you to know that a file you basically identify as byte size / filename actually finished successfully? An easy to check this is to just tail the file like this:
tail long_urls.sql

/*!40101 SET SQL_MODE=@OLD_SQL_MODE */;
/*!40014 SET FOREIGN_KEY_CHECKS=@OLD_FOREIGN_KEY_CHECKS */;
/*!40014 SET UNIQUE_CHECKS=@OLD_UNIQUE_CHECKS */;
/*!40101 SET CHARACTER_SET_CLIENT=@OLD_CHARACTER_SET_CLIENT */;
/*!40101 SET CHARACTER_SET_RESULTS=@OLD_CHARACTER_SET_RESULTS */;
/*!40101 SET COLLATION_CONNECTION=@OLD_COLLATION_CONNECTION */;
/*!40111 SET SQL_NOTES=@OLD_SQL_NOTES */;

-- Dump completed on 2016-11-23  7:50:34
That's what the tail of a successful MySQL dump should look like. The key thing is – Dump completed on 2016-11-23 7:50:34.
Step 10 - Why Didn't I Try maatkit or something else?
You'll notice that I used straight up mysqldump as my backup tool. Why would I do that when there are higher performance alternatives like maatkit, mydumper or mysqlhotbackup? Well it all comes down to trust:
- mysqldump for all the issues is solid. I've used it for more than a decade and it has never given me issues – when I used it correctly. Any issues I've had have been user error and that hasn't happened for at least a decade.
- mysqldump is regularly maintained. maatkit seems to have last been maintained in 2013 while mydumper is about a year since last maintenance. While I'm not one to take the position that old software is dead software, for something as critical as a backup tool it does make me a little bit squeamish.
- All of this happened over the U.S. Thanksgiving holiday and while I had time it was in dribs and drabs – often while I was in the middle of cooking – the last thing I had time for was sitting down and poring thru tech notes to figure out why the command line options for mydumper were different from mysqldump. Honestly – why would you change these? I could simply set mysqldump going on a half dozen different terminals front ended by tmux to keep them alive. That gave me concurrency if not performance.
Sidebar for Open Source Authors - Currency Matters
There are tons and tons of different open source projects that are actually fantastic but haven't really been updated recently. That doesn't mean that you shouldn't use them by any means. But, if you are an open source author, you should really be aware that the potential users of your software often look at your project in terms of its git repository. And one of the first things you notice is the datestamp which github gives you as "2 years ago", "a month ago" and so on. I'm going to illustrate this with an example from a project I really, really like: Inspeqtor. Inspeqtor is an open source monitoring tool I've written about before. Honestly it is monit with an easier configuration approach. And it is from one of my open source heroes, Mike Perham, so of course I like it. But, the first time I considered it, it hadn't been updated in about a year and I have to say that did give me pause. If I hadn't known exactly who Mike Perham was then I likely would have raced over to Monit and used it instead.
Now the secret trick for an open source is really simple – you don't have to touch the code – for github to update the last modified time stamp. All you have to do is update the readme or some other documentation file. A lot of the time when you are an open source user is that you don't want abandonware. When you choose an open source tool you're making an investment. It may be an investment of time rather than money but it damn well is an investment. And when things are abandonware the nature of that investment changes. Even if I am 90% likely to never reach out to a project in the form of an issue or support, knowing that the project is still alive means that I can. And about the only positive signal that a project is alive comes from damn timestamp that github reports so gleefully.
Step 11 - Why Didn't I Get a Real Professional?
I have to admit that it is pretty damn inconceiveable to me that in 2016 you can't resize an AWS volume dynamically particularly if you can so easily unmount it and operate it on it. And it is important to know that I am not an expert in this area. I'm not a full time ops guy nor am I a true sysadmin – I just play one on the internet from time to time. So the logical thing to do would have been to reach out to a real professional or even AWS support so why didn't I? Well it comes down to this:
- Timing. This happened just prior to a holiday so people's availability is severely constrained. I didn't want any resource involved that couldn't see it thru end to end. I know that I am fully available and I am confident enough that no matter what happened I would get thru it.
- No Backups. There were no database backups available (see next section) which means that any solution had to be 100% safe. And I could only guarantee that if I did things myself.
- Pricing. The older I get the more sensitive I get to being, what I feel, unfairly screwed. The last time I got significant talent on the spot market – i.e. when you need it immediately – that person charged me either $300 or $400 per hour for about two hours of what amounted to configuration support. And that's fine, it was his right to do that. But that degree of what I felt was dramatic unfairness meant that I will never, ever contact him again before the heat death of the universe. And the pity is that this person could easily have taken less per hour and rolled it into an ongoing relationship where I'd still be relying on him today. I mean I am still running, daily, the code he wrote. Sigh. I saw no reason to raise my blood pressure by being potentially screwed once again.
Step 12 - Flying without a Net or Life Without Database Backups
It may surprise some people that I did not have a decent backup system in place and there's a story here. This is a project that is an outgrowth of a very poorly funded project that I've been continuously working on since 2010. The aggregate code base size is north of 400K lines of Ruby and all the code growth has been organic not planned. Although other people have touched the code base at times I've been the sole author of probably 95% of it. As an incredibly poorly funded project there was never much of an ops budget and since this was a 24x7x365 system there wasn't a lot of opportunity for offline time for backup. There was about a 2 year period when we changed to one data center where I was told backups were being done. Unfortunately there were enough times were I was told that "we have a backup issue and we need to reboot all of your servers to address it" that I never once trusted it.
During the past 7 years there was only one time when an important table was accidentally dropped. That was the one case when we might have called for data recovery and we had a local copy of the same data that was only a few hours out of sync so we didn't bother. So, at least from a track record basis, I have a pretty good record for not screwing things up. One of the secrets to my success tho is I applied a very strict trust metric to database access – if I woudn't trust you to watch my kids then I wouldn't give you access to the actual database. And, surprisingly, that actually has worked out pretty well.
Now, does any of that excuse there not being backups? Absolutely not. This is now both better funded and far more mission critical so I'll get this figured out in short order. If I end up rolling my own backup solution then I'll do it on my own time and open source it. While there are different backup solutions out there, our data sets have some unique characteristics and rolling some code to automate this might be an interesting challenge. I suspect using dynamodb for tracking the backup catalog might be interesting.
Step 13 - Engineer Color Code Thyself
The biggest mistake in something like this, beyond the fact that it happened at all, is likely to come from yourself. People, particularly tired, frustrated people (and you will be both tired and frustrated from this), make mistakes. A lot of this work happens inside terminal tabs that look exactly alike. It is incrediby easy to check on this and mistake source for destination and then – WHAM – you have a real problem. And I know you are thinking that this cannot happen or "how stupid is this guy; I am smarter than that." Well you might be, I certainly am, but it still happens. And, honestly, if something like that has even a chance of happen you are better off setting things up so that it won't happen.
Just as an example, even though I'd like to think I'm smarter than that, all of this started just prior to Thanksgiving 2016 so Turkey Day 2016 was spent running back and forth between Thanksgiving cooking and seeing if certain long running exports had finished yet. Just as a 22 pound turkey seems to take forever to cook so, too, does a table dump that has this many bytes: 215121716510. Since I was in and out of things so many times, statistically, the chance that I'd make a mistake I think was actually fairly high.
When you are dealing with old and new systems that would normally look identical the best trick I've ever found is really, really simple – color code things. If you look at how much of the brain is related to vision then this actually makes sense. Making dangerous things highly visual means that they really stand out. All I did was set the background color differently for each terminal. I made all terminals related to source be solarized and all terminals related to destination be normal (black). Here is what that looks like:
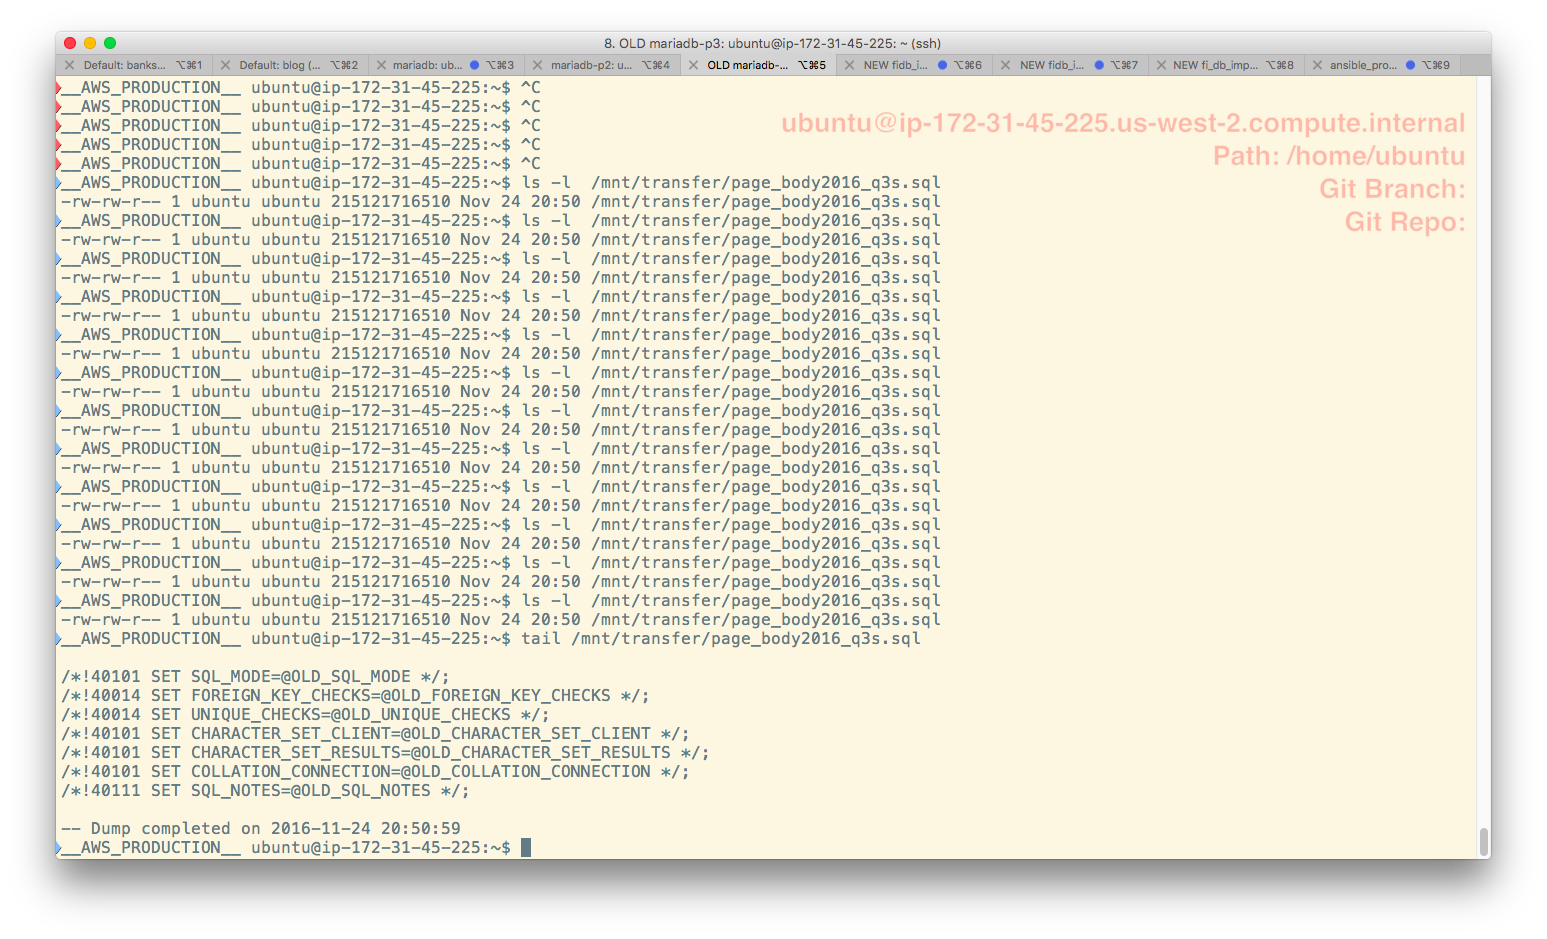
Given that I might have 3 or 4 terminals open on source and the same number on destination this makes everything so much easier.
Sidebar: I've been looking, for years, for a way to define my background terminal color on login to a different system automatically specifically to prevent this. This should happen automatically at login based on an environment variable. If anyone out there knows a unix shell scripting trick for this I'd bloody well love to hear it. Thanks!
Useful Urls
Here are some of the useful urls I came across in the process of dealing with the raft of shite associated with this minor debacle.
AWS and Disk Resizing Stuff
- (MS-DOS partition table and partition resizing)[http://askubuntu.com/questions/84538/trouble-creating-3tb-ext4-partition-due-to-msdos-partition-table-imposed-error]
- Expanding a Linux Partition
- AWS Mount Issues
- Misc Ubuntu Tech Notes
- Expanding Storage
- Mounting Disks
- Using AWS Volumes
- Reloading fstab
- Converting MBR drives to gpt
- Increasing Your Root Volume Size
- Resizing AWS Volumes
- Shrinking Volumes; hey its the inverse of what I wanted but isn't that the same thing?
- EBS Expanding Volumes
- Provisioned IOPs - interesting
- Tech Support
- Misc Tech Notes
MySQL and Innodb Stuff
Posted In: #aws #ebs #volume #linux #partition #mysql #innodb #tuning